Elvas Tower: New rail system - Elvas Tower

Jump to content

  • 12 Pages +
  • « First
  • 10
  • 11
  • 12
  • You cannot start a new topic
  • You cannot reply to this topic

New rail system Rate Topic: -----

#111 User is offline   ErickC 

  • Superintendant
  • Group: Status: Elite Member
  • Posts: 1,002
  • Joined: 18-July 17
  • Gender:Male
  • Location:Hastings, MN, US
  • Simulator:ORTS
  • Country:

Posted 30 January 2021 - 08:50 PM

Attached Image: 62.JPG

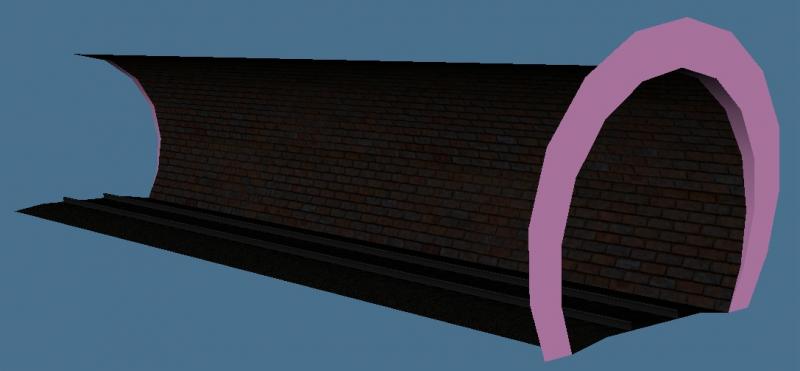
The round tunnel master piece. The end pieces lack materials because the MSTS gamepack treats the sub-components of a multi-material as separate materials when only one of them is applied to another part, so instead of seamlessly attaching, like they would in any other gamepack, GMax will try to combine the materials somehow. I've decided that this runs the risk of adding extra duplicates of a material, so I've removed all materials from the end pieces. When the geometry of the piece is finalized, these can be snapped to the ends, rotated as necessary, and attached to the main mesh. The material IDs are set up correctly already, so this will apply the correct materials. Follow this up by welding the verts with a .001m threshold. Export.

#112 User is offline   Genma Saotome 

  • Owner Emeritus and Admin
  • PipPipPipPipPipPipPipPipPipPipPipPipPip
  • Group: ET Admin
  • Posts: 15,350
  • Joined: 11-January 04
  • Gender:Male
  • Location:United States
  • Simulator:Open Rails
  • Country:

Posted 30 January 2021 - 09:31 PM

View PostErickC, on 30 January 2021 - 05:18 PM, said:

That's what I was thinking, even as a retrofit, it just doesn't make sense to span the gap.

For the tunnel pieces, I'd imagine you could copy the shapes, decompress them, change the texture name, recompress them, and then use those shapes where you need them.


Well, yes. I suppose the operative question is whether you were thinking of provide those textures, renaming copies of the .s and .sd files, and doing a fileset find and replace to change the texture name. These then (and any other alternative set you can be persuaded to create) go into the routes own \shapes folder.

You up for that or is that a task too far?

#113 User is offline   ErickC 

  • Superintendant
  • Group: Status: Elite Member
  • Posts: 1,002
  • Joined: 18-July 17
  • Gender:Male
  • Location:Hastings, MN, US
  • Simulator:ORTS
  • Country:

Posted 30 January 2021 - 10:37 PM

At the moment, I'm just trying to wrap my head around the idea of doing the 170 default track pieces, then the 23895903457934757347 XTracks pieces (I exaggerate, but when I look at my global folder, I have 1,128 french fry track shapes of all kinds). Although I can see doing some alternate tunnel pieces as a project worth tackling once those tasks are done.

#114 User is offline   ErickC 

  • Superintendant
  • Group: Status: Elite Member
  • Posts: 1,002
  • Joined: 18-July 17
  • Gender:Male
  • Location:Hastings, MN, US
  • Simulator:ORTS
  • Country:

Posted 31 January 2021 - 11:13 AM

Okay, I think I feel comfortable saying that the texture mapping is not going to change, the profile has been finalized, and the master files I have created (A1T, A2T, A3T, A4T, A1T_tun, A1T_roundtun, A2T_tun - all 12m long) are ready to be used to make track. The next phase will be building the dynamic track profile and the small parts that can be placed in the empty space on the map, such as:

  • Switch stands
  • Buffers
  • Switch pieces
  • Odds and ends


I am not comfortable uploading the source files to a file library yet, as the texture map is subject to change as new objects are added to the empty spaces, and you know how it is when you release WIP for developers into the wild and the average user gets ahold of it (five years from now we'll be answering emails every day that go "why are muh switch stands black?"). But I am comfortable sharing the current master files to anyone who wants to start toying with them or building pieces. Send me a PM if that's what you'd like, but be aware that I am often busy during the week so my responses may be delayed. Remember to extend all pieces 5mm past the nominal end point. For curved pieces, this is easily done by creating two vertices 5mm apart, rotating them by the desired angle, and snapping one of them to the desired end point on the reference cylinder. You can then use that vertex as the snap point for the temporary centerline vertex from the procedure that I outlined above. I will eventually write a PDF doc that outlines all of these steps with screen caps when I have the final master files and master textures done.

I have settled on a switch stand style for the manual switches:

https://www.worthpoi...ever-1883735606

It's simple, similar to the original, and could be made quickly.

When the next phase is complete, and I have a final map that has everything placed in it, and I've written an instruction manual for developers, then I will upload all of those master files into the public domain.
  • 12 Pages +
  • « First
  • 10
  • 11
  • 12
  • You cannot start a new topic
  • You cannot reply to this topic

3 User(s) are reading this topic
0 members, 3 guests, 0 anonymous users