Elvas Tower: Proctor & Gamble - Elvas Tower

Jump to content

Page 1 of 1
  • You cannot start a new topic
  • You cannot reply to this topic

Proctor & Gamble 1200 W North Ave Rate Topic: -----

#1 User is offline   Genma Saotome 

  • Owner Emeritus and Admin
  • PipPipPipPipPipPipPipPipPipPipPipPipPip
  • Group: ET Admin
  • Posts: 15,356
  • Joined: 11-January 04
  • Gender:Male
  • Location:United States
  • Simulator:Open Rails
  • Country:

Posted 18 November 2012 - 04:54 PM

Proctor & Gamble (P&G), as most of you know, is what they call a household name. Started in Cincinnati in 1837, the company is known for Ivory Soap, Gillette Razors, Tide Laundry detergent, Crest Toothpaste, Pampers Diapers and countless other consumer products.

The Chicago plant, 1200 West North Ave, was built over several years in the late 1920's and operated until 1990. It was torn down some short time after that. For the Goose Island Project the P&G plant is just a stones throw west of the Milwaukee Roads Cheery St bridge that leads over the river onto Goose Island. Rail service to P&G was provided by the C&NW... at a minimum I'll provide enough track for scenery purposes, maybe more if there is a phase 2 to the project.

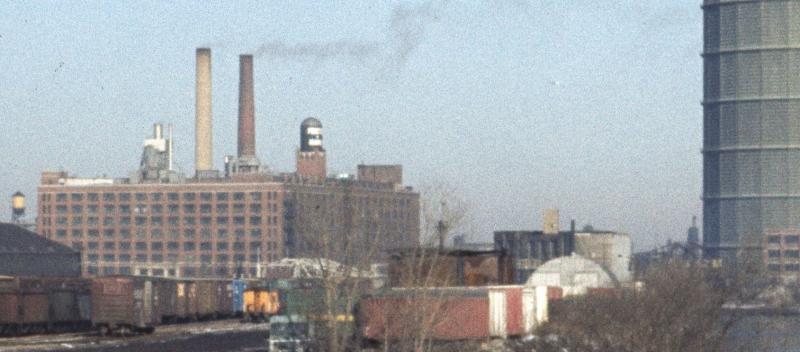
Here's a portion of one of the few color photos I've found:

Attached Image: Clipboard0011.jpg


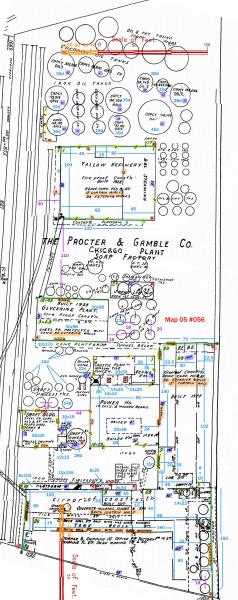
For making a model I use the relevant page from the Sanborn Maps, carefully marking up dimensions and other key attributes. Sometimes the model doesn't cover much area and in other cases, like this one, it covers a lot. So far I've only marked up (and build) a portion of the whole, but here's the whole property:

Attached Image: Clipboard0010.jpg


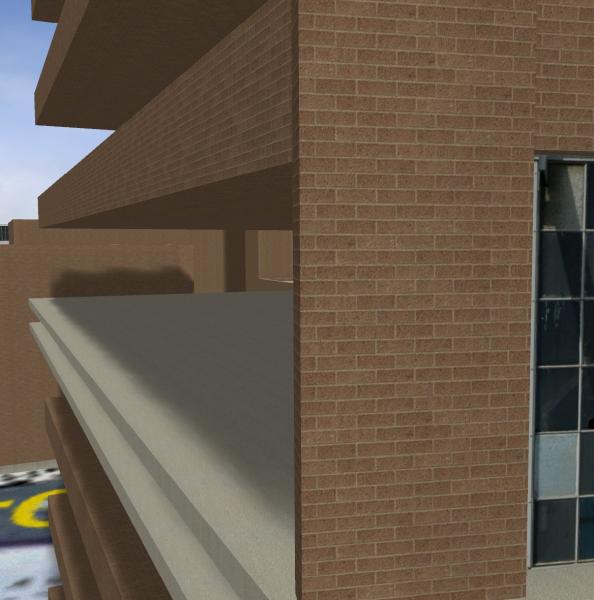
Taking that information over to Sketchup I can create something very quickly. Adding more detail takes more time of course. So far, I have this:

Attached Image: Clipboard0007.jpg


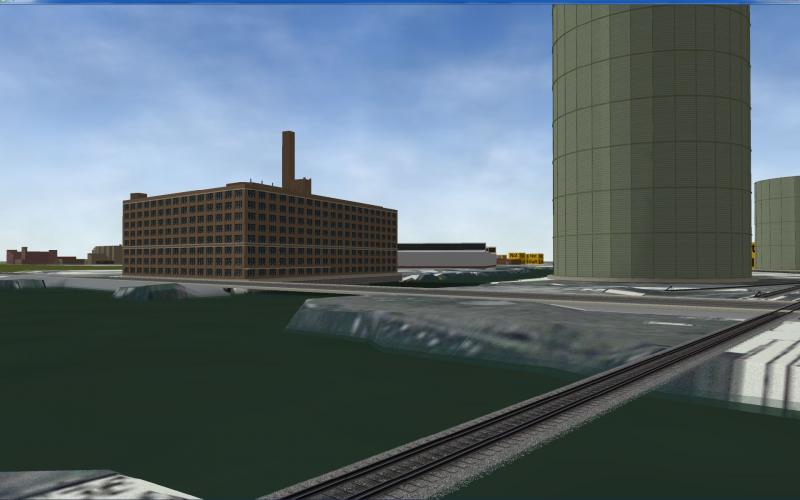
Needs a front door and those windows are light weight California aluminum frames... but for now it serves well enough. This part of the plant covers perhaps the south 10-15% of the whole. As I continue to work on this site I will do so in the one Sketchup model, just to ensure things are located properly. When get the basics in I'll begin to split it up into several models so the shortest LOD distance on each allows for details to disappear for most viewing ranges.

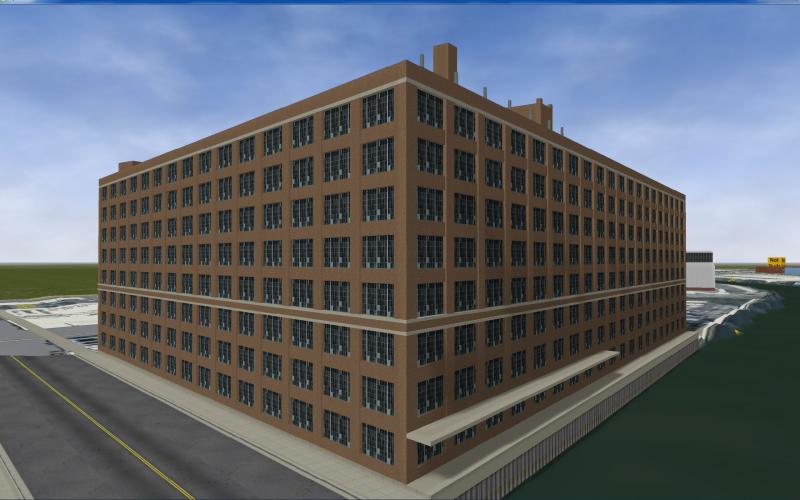
As seen from the south side of the Cherry St bridge, looking NNW:

Attached Image: Clipboard0012.jpg

I'll add more shots as construction proceeds.

#2 User is offline   Coonskin 

  • Open Rails Developer
  • Group: Status: Elite Member
  • Posts: 3,723
  • Joined: 15-January 04
  • Gender:Male
  • Location:Eastern Oklahoma
  • Country:

Posted 18 November 2012 - 05:56 PM

Nice structure you've got coming along there, Dave. What did you use for your window/brick tile texture?

#3 User is offline   Genma Saotome 

  • Owner Emeritus and Admin
  • PipPipPipPipPipPipPipPipPipPipPipPipPip
  • Group: ET Admin
  • Posts: 15,356
  • Joined: 11-January 04
  • Gender:Male
  • Location:United States
  • Simulator:Open Rails
  • Country:

Posted 18 November 2012 - 06:50 PM

The windows is from a photo I took in either Emeryville or Berkeley. The brick is a modified image of brick sold by either Beldon or Acme. I have ~60 different brick textures in my library and perhaps 150-175 window textures. It's not enough... I could very easily use double the count of window textures and probably still feel short. Brick... hmmm maybe another two dozen, maybe a few less... and I'd be set.

Here's a closeup of the P&G textures:
Attached Image: Clipboard0013.jpg


Rolling the camera left a few degrees exposes the unbuilt west face:

Attached Image: Clipboard0014.jpg

There you can see that I run surfaces thru the interior to they pass thru the opposite walls. That allows me to use 3d details at much lower cost. Take the concrete layer that forms the window sill: A very flat cube of 12 polys makes the sills for the ~40 windows you see in the screenshot in post #1 and likely another ~60 for the three walls that are out of sight. IMO that's dirt cheap. I do the same w/ the vertical pilasters -- each of those pass thru and pop out of the opposite wall. Makes for a pretty full interior.

#4 User is offline   Noisemaker 

  • Executive Vice President
  • Group: Status: Elite Member
  • Posts: 3,354
  • Joined: 02-August 07
  • Gender:Male
  • Country:

Posted 18 November 2012 - 06:58 PM

I have to laugh Dave, because I grew up looking at Proctor & Gambles sign just down the street from me atop a office building for most of my life. Plus we Torontonians also have a infamous Cherry St. at the east end of our lake shore with great bridges and old industries and such. And too, I just did a small hall today that I thought would be a cinch with SU. Hard to put photo images on it, so I thought I'd just use the SU materials sparingly. Then seeing the structure with Bing Maps Birdseye view, I could see the back end clearly, and it was very elaborate and ornate - which is the end that faces the tracks, wouldn't you know it! So like you, here I am spending the day detailing it just so. ;) But great windows you have on this one, how did you come across those? And the concrete trim, is that part of the overall face texture, or did you draw that in as well? Really great how you got it into the window sashes and all.

#5 User is offline   Genma Saotome 

  • Owner Emeritus and Admin
  • PipPipPipPipPipPipPipPipPipPipPipPipPip
  • Group: ET Admin
  • Posts: 15,356
  • Joined: 11-January 04
  • Gender:Male
  • Location:United States
  • Simulator:Open Rails
  • Country:

Posted 18 November 2012 - 07:07 PM

The concrete trim is 3d and is using a texture I created myself. I'm getting a few better concrete textures added to my library so I may swap this one out for a newer one, one the shows more variation.

Oh... if it's not clear already, I do not "assemble" whole-picture textures but instead use single purpose textures that tile... so brick, window (including mullions and frame), and concrete are three different textures applied to the specific polys.

#6 User is offline   Noisemaker 

  • Executive Vice President
  • Group: Status: Elite Member
  • Posts: 3,354
  • Joined: 02-August 07
  • Gender:Male
  • Country:

Posted 19 November 2012 - 10:37 AM

So would these textures/materials be that much bigger than the standard SU ones? Really surprised Google and/or Trimble or even the users have not made a new materials pack. I got one upgrade which offers more brick and metal and such. But was really hoping for more window frames and doors and things. I've made some 'General Textures' for myself off finds on the net, but nowhere close to the quality you're getting Dave. But Trimble should be able to put out something comparable for us SU users, or am I missing something? For me, it just winds up to that old Motorhead anthem 'The Chase Is Better Than The Catch'. ;)

#7 User is offline   Genma Saotome 

  • Owner Emeritus and Admin
  • PipPipPipPipPipPipPipPipPipPipPipPipPip
  • Group: ET Admin
  • Posts: 15,356
  • Joined: 11-January 04
  • Gender:Male
  • Location:United States
  • Simulator:Open Rails
  • Country:

Posted 19 November 2012 - 12:49 PM

I don't use the SketchUp textures at all so I don't know the answer to your question.

The textures I use are probably oversized for the surface area they cover (before tiling). My stuff ranges from 128x128 to 512x512. The brick is 512x512 and it covers an area that's 5.5 ft x 6ft. It probably doesn't need to be that large -- generally speaking, the smallest I'm willing to go w/ textures is 1 pixel of texture for one square inch of model and so the brick sizes out about 7x larger than my minimum.

I don't recall now why the brick is sized that way... might have been more moire when it was smaller or maybe the mortar wasn't really visible; I dunno now.

At for the cost to use textures sized like that, I am able to check how much ram is being used by my video card and it's never been close to the 1gb max. I suspect the reason is I reuse the textures extensively and the video card needs only one instance for all models (true for both MSTS and Open Rails). IOW the brick texture may be oversized but when it gets shared across 3-5 models its performance cost isn't so high anymore.

#8 User is offline   Noisemaker 

  • Executive Vice President
  • Group: Status: Elite Member
  • Posts: 3,354
  • Joined: 02-August 07
  • Gender:Male
  • Country:

Posted 19 November 2012 - 02:49 PM

Surprisingly, some of the SU basic materials - especially the ones found in this elusive 'upgrade pack' are pretty comparable to what you're using brick wise. They tile well, and I don't think exceed beyond 256x256. Most are 128 or less I think. And thankfully they are the 'real deal' too, unlike the 'metal corrugated brown' texture - which is one of those 'tinted' textures of Metal_Corrugated_Shiny. Much to my chagrin, after exportin the model, the tower bit all came out white almost. And sadly, thinking I could use the great 'Make Unique Texture' feature right of the model side - it reverts it back to this Metal_Shiny too and does away with the tint. So then it's PrntScrn, cut and paste the little stamp, yada-yada. Okay for a lesser metal something - but for bricks and shingles, it's really rotten on. Anyhow, the basic bricks and shingles are pretty good in SU now I find.

Plus, I find I'm getting pretty good at the sizing of them too. I used to go at splattering say the Concrete_Block_8x8 on a wall. But never seemed to look right? Looking in at the Edit of it, SU has it at 4' x 4'? Changing it to 8' makes the world of difference! And too with some of their bricks, just really under scaled to be realistic. But setting them to 4' or more really brings them out to a more realistic scale size and cuts down on that moire effect as well.

But if you can find the suitable textures readily and make them happen, all the power to you! I too wondered if it's better to go with 'bigger tiles' or simpler smaller ones. The one thing for bigger tiles would be in weathering them. The small tiles just can't take any snow or grime and come out looking 'sporadic' even on the smallest structure.

#9 User is offline   Coonskin 

  • Open Rails Developer
  • Group: Status: Elite Member
  • Posts: 3,723
  • Joined: 15-January 04
  • Gender:Male
  • Location:Eastern Oklahoma
  • Country:

Posted 19 November 2012 - 04:06 PM

Thanks for the reply, Dave. Like the way your brick/window tile looks.

Page 1 of 1
  • You cannot start a new topic
  • You cannot reply to this topic

1 User(s) are reading this topic
0 members, 1 guests, 0 anonymous users